Other request properties
Each request in the web test
has its own properties and there may be many dependent requests for each
main request. We can get and set some properties even at the dependent
request level. This is based on the request submit method GET or POST
used for the request. We can set values for the parameters used in the
request. Also there are some validation rules and extraction rules that
can be used to extract the information from the request response.
Form post parameters
These are the parameters
sent along with the request if the method used for the request is POST.
All field entries made by the user in the web page are sent to the
server as form POST parameters. After recording we can check the actual
values of the parameters that were sent during the request.
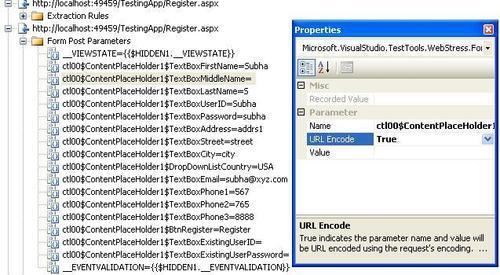
Name denotes the name of the component used for collecting the data.
Recorded Value is the value entered by the user during recording. This is a read only field assigned while recording.
URL Encode determines whether the Name and Value of the parameter should be URL encoded or not. The default is True.
Value is
the actual parameter value which should be used during testing.
Initially it is set to the same value as recorded value but user can
change it. This property also has the flexibility to bind it to a
different data source such as Database or XML file or a CSV File. This
is very useful in case of testing for different source of information
and multiple test runs with different set of data. The next section
covers more on how to add the new data source and point to the fields.
In the below screenshot the field Middle Name
was not entered by the user before submitting the form so it contains
nothing. The tester can change the parameter value by selecting the form
parameter property and changing the value field.
Sometimes, there are
additional properties based on the type of control we use on the Web
page. In that case we may have to set those properties as well. For
example, if we use the File Upload control we may have to set the type of the file that we will be uploading.
Query string parameters
This is very similar to the Form POST Parameters. These query string parameters are listed under the request, which used the QueryString method for the request.
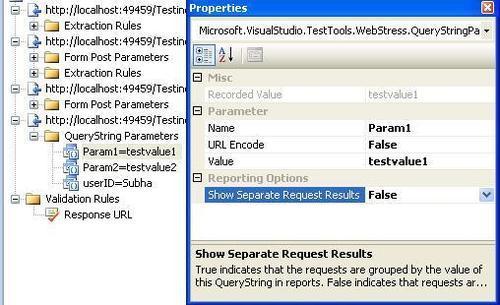
The properties and the usage of the QueryString Parameters are the same as the Form Post Parameters properties, except the additional property which is Show Separate Request Result.
This property is used for grouping the requests based on the value of
this query string parameter. This is very much useful in load testing
for grouping a bunch of requests based on this field value. The default
is False.
Extraction rules
Extraction rules are useful
for extracting the data or information from the HTTP response. Normally
in web applications many web forms depend on other web forms. It means
that the request is based on the data collected from the previous
request's response. Each request from the client in the web gets some
kind of response from the server with the expected data within it. The
data from the response has to be extracted and then passed on to the
next request in the form of passing the values using query strings or
value persisted in the view state object or using the hidden fields.
In our previous examples, we
used the new user registration page where the user can enter all the
details to get registered or the user can enter the user ID and password
to log in to the page and get the orders placed earlier and also to
place new orders. In this case, once the user enters the login details
and clicks Login we have to validate the user and pass on the user information to the next Orders.aspx page where the orders for the user are displayed.
This validated user information is hidden somewhere in the request using ViewState or Hidden
fields. In this case we can use the Extraction rules to extract the
user information and pass it on to the next request or the further
requests. We can extract the information and store it in the context
parameter and use it globally across all requests, which are followed
after this.
VSTS
provides several built-in types of extraction rules. This helps us to
extract the values based on the HTML tags or different type of fields
available in the web form. If we need additional extraction behaviour,
which is not supported by the existing one, then we can go for the
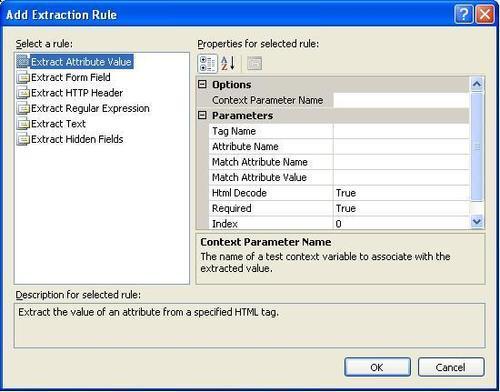
custom rules. Given below are the existing Extraction rule types.
|
Rule Type
|
Description
|
|---|
|
Extract Attribute Value
|
This is to extract the attribute value from the request page based on
the tag and the attribute name. We can also use the optional matching
attribute name and value within the same tag to find out the required
attribute easily. The extracted value will be stored in the context
parameter.
|
|
Extract Form Field
|
To extract the value from any of the Form fields in the response. The field name is identified here.
|
|
Extract HTTP Header
|
To extract the HTTP message header value in the response page.
|
|
Extract Regular Expression
|
Extracts the value using the regular expression to find the matching pattern in the response
|
|
Extract Text
|
This is to extract the text from the response page. The text is identified based on its starting and ending value with text Casing as optional.
|
|
Extract Hidden Fields
|
Extracts all hidden field values from the response and assigns that to the context parameter
|
The screenshot below shows how to set the properties of the Extraction Rules. This extraction rule is created for a sample HTML image used on the page. The extraction rule type is an Attribute Value rule to find the image source URL used for the image.
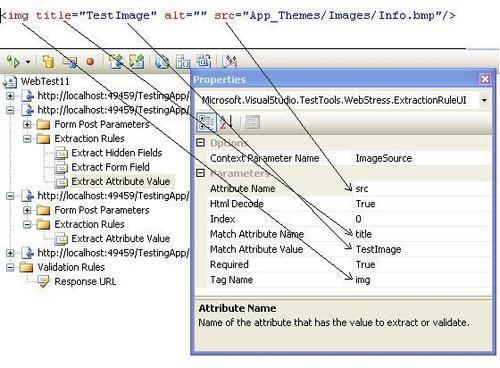
We can add as many rules as we want, but we should make sure the Context Parameter Names are unique across the application. It is like a global variable used in the application, which is referred in all the forms.
By default, Visual Studio
adds extraction rules for hidden fields automatically. The references
to the hidden fields are also automatically added to the Form POST Parameters and Query String Parameters.
For coded web tests we can create a custom extraction rule by deriving from ExtractionRule class.
Validation rules
Every application has some
sort of validations done on the input and output data. For example, a
valid email address or a valid username without any special characters
or a valid password not less than six letters. All these validations are
performed using the validation rule against the fields as per the
expectation.
Validation rules are
nothing but defining some criteria which the information contained in
the response has to pass through. All the data collected from the
response is validated against the set of defined rules. If it passes, it
means that the response is validated otherwise the test fails. For
example, if the user has to enter a specific value or if the user has to
select a value from a set of values then we can define these
validations as rules and use against the values returned in the response
fields.
VSTS provides a set of predefined rules for validations. These rules are used for checking the text returned by the response.
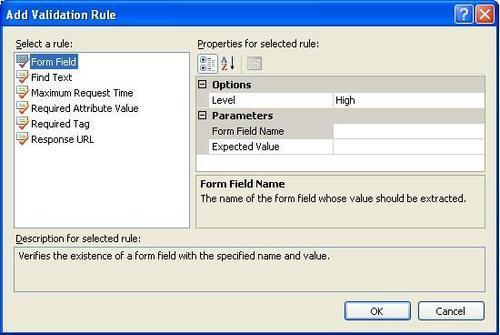
For adding the validation rules, just right-click on the request and select the Add Validation Rule
option which opens the validation rule's dialog. In here, select the
type of validation rule required and fill the parameters required for
the rule.
|
Validation Rule Type
|
Description
|
|---|
|
Form Field
|
The existence of the form field name and value is verified using this. The parameters are
Form Field Name
Expected value
|
|
Find Text
|
This is to verify the existence of a specified text in the response. The parameters used for this are:
Find Text
Ignore Case
Use Regular Expression
Pass If Text Found
|
|
Maximum Request Time
|
This is to verify whether the request finishes within the specified Maximum request Time
Max Request Time (milliseconds)
|
|
Validation Rule Type
|
Description
|
|
Required Attribute Value
|
This is similar to the attribute used in the Extraction rules. In
extraction rules, we just extracted the value of the specific attribute
using the tag and the other attribute within the tag. But here in
validation rules we use the same tag to find whether the attribute is
returning the expected value. The parameters used here are the same as
the one used in extraction rules with an additional field to specify the
expected value. The properties are:
Tag Name
Attribute Name
Match Attribute Name
Match Attribute Value
Expected Value
Ignore Case
Index
The index is used here to indicate which occurrence of the string to validate. If this index is set to -1, then it checks any form field value in the form and passes the test if any one match is found.
|
|
Required Tag
|
To verify if the specified tag exists in the response. We can also set
the minimum occurrence if there is a chance of getting the same tag many
numbers of times in the response. The parameters are
Required Tag Name
Minimum Occurences
|
|
Response URL
|
This is to verify the URL is the same as the Expected URL. The property
is the level for the response URL. The level can be any High or Medium
or Low.
|
We can keep adding any
number of validation rules we want, but as the number grows the
performance or the time taken for the test will also grow. So we should
decide which one is important in case of load testing, these rules will
affect the time taken for the test.
In all the rule types, we have a special parameter known as the Level which can be set to Low or Medium or High.
As mentioned earlier, the load test performance is directly affected by
number of validation rules we have. So to control the execution of
rules in a request during the load test, we can use the level property.
The level does not mean the priority for the rule but it says when it
should get executed based on the load test property. The load test also
has similar property such as Low or Medium or High.
Based on the below load test property, the rules with the corresponding levels will get run during the load test:
Low—all validation rules with level Low will be run.
Medium—all validation rules with level Low and Medium will be run.
High—all validation rules with level Low, Medium, and High will be run.
Based on the importance of the load test importance, we can set the property of the rules.
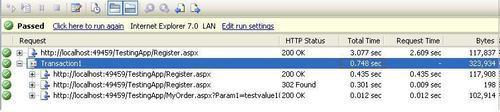
Transactions
Transactions are very useful
to group a set of activities. Here in this case, we can group a set of
requests so that we can track the total time taken for the set of
requests for our analysis. This is also helpful to collect the timing of
the individual requests.
We just have to say the
starting request and the ending request for the transaction so that all
the requests in between these two requests will be part of the
transaction including these two requests.
To add a transaction, select the starting request from where the transaction should start and right-click and choose Insert Transaction option.

The Transaction dialog
requires a name for the transaction and then the requests for the first
item and last item for the transaction. When you choose both and say OK,
the transaction is added before the first item selected for the
transaction and all the other requests between the first and last item
including first ad last are part of the transaction as shown below:
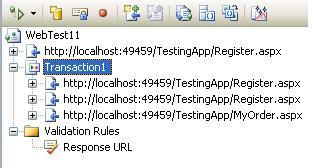
So when the test is run you can see the total time taken for all the requests under the transaction.